# Repeat:可复用的循环渲染
> **说明:**
>
> Repeat从API version 12开始支持。
>
> 本文档仅为开发者指南。API参数说明见:[Repeat API参数说明](../reference/apis-arkui/arkui-ts/ts-rendering-control-repeat.md)。
## 概述
Repeat基于数组类型数据来进行循环渲染,一般与容器组件配合使用。Repeat组件包含两种模式:**non-virtualScroll模式**和**virtualScroll模式**。
- **non-virtualScroll模式**:Repeat在初始化页面时加载列表中的所有子组件,适合**短数据列表/组件全部加载**的场景。详细描述见[non-virtualScroll模式](#non-virtualscroll模式)。
- **virtualScroll模式**(开启[virtualScroll](../reference/apis-arkui/arkui-ts/ts-rendering-control-repeat.md#virtualscroll)开关):Repeat根据容器组件的**有效加载范围(可视区域+预加载区域)** 加载子组件。当容器滑动/数组改变时,Repeat会根据父容器组件传递的参数重新计算有效加载范围,实时管理列表节点的创建与销毁。
该模式适合**需要懒加载的长数据列表/通过组件复用优化性能表现**的场景。详细描述见[virtualScroll模式](#virtualscroll模式)。
> **说明:**
>
> Repeat与ForEach、LazyForEach的区别:
>
> - 相较于[ForEach](arkts-rendering-control-foreach.md)组件,non-virtualScroll模式在以下两个维度实现了优化升级:首先,针对特定数组更新场景的渲染性能进行了优化;其次,将子组件的内容/索引管理职责转移至框架层面。
> - 相较于[LazyForEach](arkts-rendering-control-lazyforeach.md)组件,virtualScroll模式直接监听状态变量的变化,而LazyForEach需要开发者实现[IDataSource](../reference/apis-arkui/arkui-ts/ts-rendering-control-lazyforeach.md#idatasource10)接口,手动管理子组件内容/索引的修改。除此之外,Repeat还增强了节点复用能力,提高了长列表滑动和数据更新的渲染性能。Repeat增加了模板(template)的能力,在同一个数组中,根据开发者自定义的模板类型(template type)渲染不同的子组件。
下面的示例代码使用Repeat组件的virtualScroll模式进行循环渲染。
```ts
// 在List容器组件中使用Repeat virtualScroll模式
@Entry
@ComponentV2 // 推荐使用V2装饰器
struct RepeatExample {
@Local dataArr: Array = []; // 数据源
aboutToAppear(): void {
for (let i = 0; i < 50; i++) {
this.dataArr.push(`data_${i}`); // 为数组添加一些数据
}
}
build() {
Column() {
List() {
Repeat(this.dataArr)
.each((ri: RepeatItem) => { // 默认模板
ListItem() {
Text('each_A_' + ri.item).fontSize(30).fontColor(Color.Red) // 文本颜色为红色
}
})
.key((item: string, index: number): string => item) // 键值生成函数
.virtualScroll({ totalCount: this.dataArr.length }) // 打开virtualScroll模式,totalCount为期望加载的数据长度
.templateId((item: string, index: number): string => { // 根据返回值寻找对应的模板子组件进行渲染
return index <= 4 ? 'A' : (index <= 10 ? 'B' : ''); // 前5个节点模板为A,接下来的5个为B,其余为默认模板
})
.template('A', (ri: RepeatItem) => { // 'A'模板
ListItem() {
Text('ttype_A_' + ri.item).fontSize(30).fontColor(Color.Green) // 文本颜色为绿色
}
}, { cachedCount: 3 }) // 'A'模板的缓存列表容量为3
.template('B', (ri: RepeatItem) => { // 'B'模板
ListItem() {
Text('ttype_B_' + ri.item).fontSize(30).fontColor(Color.Blue) // 文本颜色为蓝色
}
}, { cachedCount: 4 }) // 'B'模板的缓存列表容量为4
}
.cachedCount(2) // 容器组件的预加载区域大小
.height('70%')
.border({ width: 1 }) // 边框
}
}
}
```
运行后界面如下图所示。

## 使用限制
- Repeat一般与容器组件配合使用,子组件应当是允许包含在容器组件中的子组件,例如,Repeat与[List](../reference/apis-arkui/arkui-ts/ts-container-list.md)组件配合使用时,子组件必须为[ListItem](../reference/apis-arkui/arkui-ts/ts-container-listitem.md)组件。
- 当Repeat与自定义组件或[@Builder函数](./arkts-builder.md)混用时,必须将RepeatItem类型整体进行传参,组件才能监听到数据变化,如果只传递`RepeatItem.item`或`RepeatItem.index`,将会出现UI渲染异常。详细见[Repeat与@Builder混用的限制](#repeat与builder混用的限制)。
Repeat virtualScroll模式使用限制:
- 必须在滚动类容器组件内使用,仅有[List](../reference/apis-arkui/arkui-ts/ts-container-list.md)、[Grid](../reference/apis-arkui/arkui-ts/ts-container-grid.md)、[Swiper](../reference/apis-arkui/arkui-ts/ts-container-swiper.md)以及[WaterFlow](../reference/apis-arkui/arkui-ts/ts-container-waterflow.md)组件支持Repeat virtualScroll模式。
- virtualScroll模式不支持V1装饰器,混用V1装饰器会导致渲染异常,不建议开发者同时使用。
- 必须创建且只允许创建一个子组件,生成的子组件必须是允许包含在Repeat父容器组件中的子组件。
- 滚动容器组件内只能包含一个Repeat。以List为例,同时包含ListItem、ForEach、LazyForEach的场景是不推荐的;同时包含多个Repeat也是不推荐的。
- totalCount值大于数组长度时,在父组件容器滚动过程中,应用需要保证列表即将滑动到数据源末尾时请求后续数据,直到数据源全部加载完成,否则列表滑动的过程中会出现滚动效果异常。解决方案见[totalCount值大于数据源长度](#totalcount值大于数据源长度)。
Repeat通过键值识别数组如何改变:增加了哪些数据、删除了哪些数据,以及哪些数据改变了位置(索引)。键值生成函数`.key()`的使用建议如下:
- 即使数组发生变化,开发者也必须保证键值key唯一。
- 每次执行`.key()`函数时,使用相同的数据项作为输入,输出必须是一致的。
- 允许在`.key()`中使用index,但不建议开发者这样做。因为在数据项移动时索引index发生变化,key值因此改变,导致Repeat认为数据发生了变化,从而触发子组件重新渲染,降低性能表现。
- 推荐将简单类型数组转换为类对象数组,并添加一个`readonly id`属性,在构造函数中给它赋一个唯一的值。
> **说明:**
>
> Repeat子组件节点的操作分为四种:节点创建、节点更新、节点复用、节点销毁。其中,节点更新和节点复用的区别为:
>
> - **节点更新**:组件节点不下树,只有状态变量刷新。
> - **节点复用**:旧的节点下树,但不会销毁,存储在空闲节点缓存池;新节点从缓存池中获取可复用的节点,重新上树。
## non-virtualScroll模式
### 键值生成规则
`.key()`的逻辑如下图所示。
当`.key()`缺省时,Repeat会生成新的随机键值。当发现有重复key时,Repeat会在已有键值的基础上递归生成新的键值,直到没有重复键值。

### 子组件渲染逻辑
在Repeat首次渲染时,子组件全部创建。数组发生改变后,Repeat的处理分为以下几个步骤:
首先,遍历旧数组键值,如果新数组中没有该键值,将其加入键值集合deletedKeys。
其次,遍历新数组键值,依次判断以下条件,符合条件时进行对应的操作:
1. 若在旧数组中能找到相同键值,直接使用对应的子组件节点,并更新索引index;
2. 若deletedKeys非空,按照先进后出的顺序,更新该集合中的键值所对应的节点;
3. 若deletedKeys为空,则表示没有可以更新的节点,需要创建新节点。
最后,如果新数组键值遍历结束后,deletedKeys非空,则销毁集合中的键值所对应的节点。

以下图中的数组变化为例。

根据上述判断逻辑,`item_0`没有变化,`item_1`和`item_2`只更新了索引,`item_n1`和`item_n2`分别由`item_4`和`item_3`进行节点更新获得,`item_n3`为新创建的节点。
## virtualScroll模式
### 键值生成规则
和non-virtualScroll模式的逻辑基本一致,如下图所示。
当`.key()`缺省时,Repeat会生成新的随机键值。当存在重复key时,Repeat会重新生成随机key作为当前数据项的键值并且放进该列表。列表中已有的键值不受影响。随机key的构成:`___${index}_+_${key}_+_${Math.random()}`,其中的变量依次为:索引、旧键值、随机数。

### 子组件渲染逻辑
在Repeat首次渲染时,根据容器组件的有效加载范围(可视区域+预加载区域)创建当前需要的子组件。
在容器滑动/数组改变时,将失效的子组件节点(离开有效加载范围)加入空闲节点缓存列表中(断开与组件树的关系,但不销毁),在需要生成新的组件时,对缓存里的组件进行复用(更新被复用子组件的变量值,重新上树)。
Repeat组件在virtualScroll模式下默认启用复用功能。从API version 16开始,可以通过配置`reusable`字段选择是否启用复用功能。为提高渲染性能,建议启用复用功能。代码示例见[VirtualScrollOptions对象说明](../reference/apis-arkui/arkui-ts/ts-rendering-control-repeat.md#virtualscrolloptions对象说明)。
#### 滑动场景
滑动前节点现状如下图所示
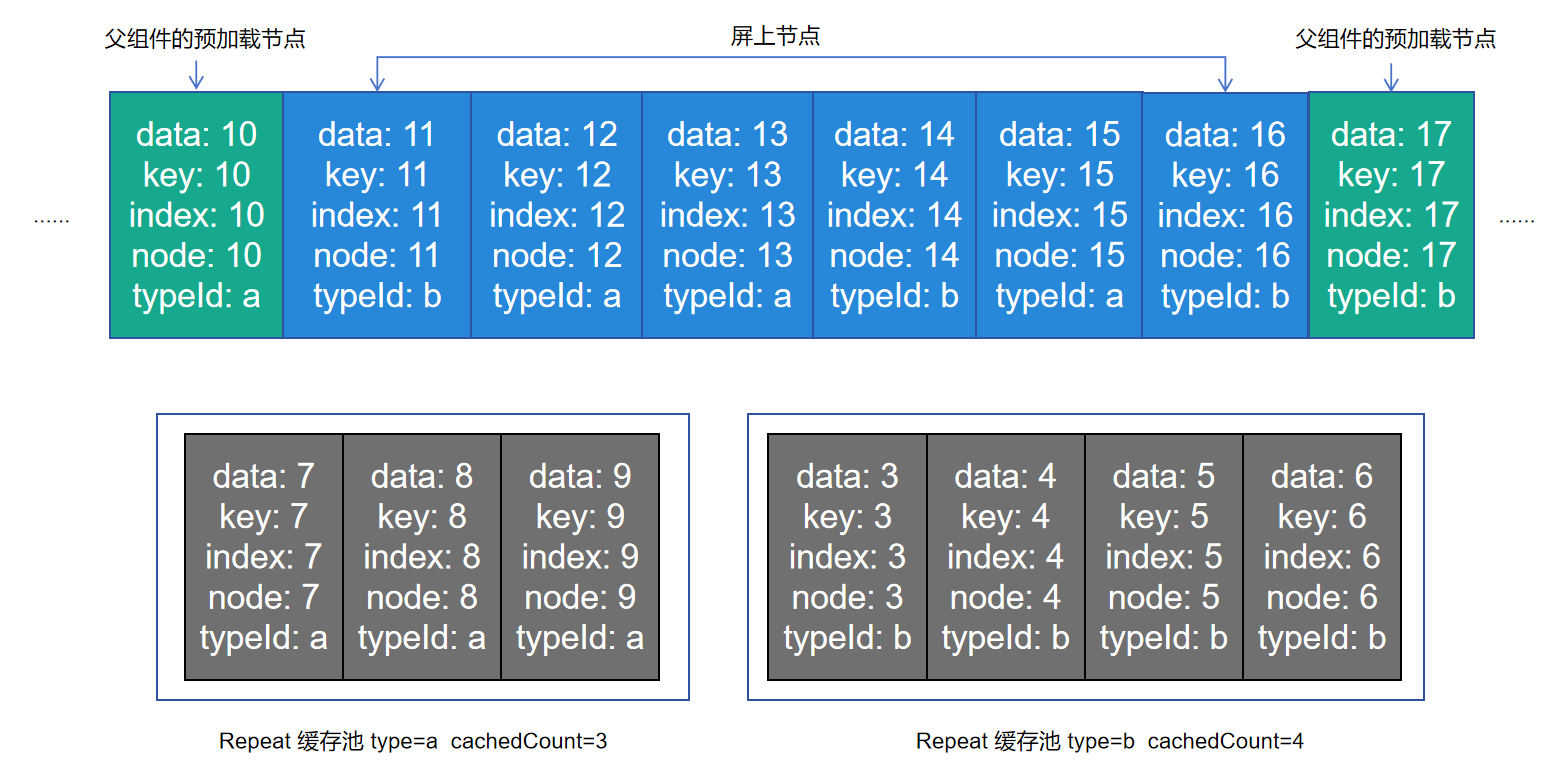
当前Repeat组件template type有a和b两种,template type等于a对应的缓存池,其最大缓存值为3,template type等于b对应的缓存池,其最大缓存值为4,其父组件默认预加载节点1个。这时,向右滑动屏幕(屏幕内容右移),Repeat开始复用缓存池中的节点。
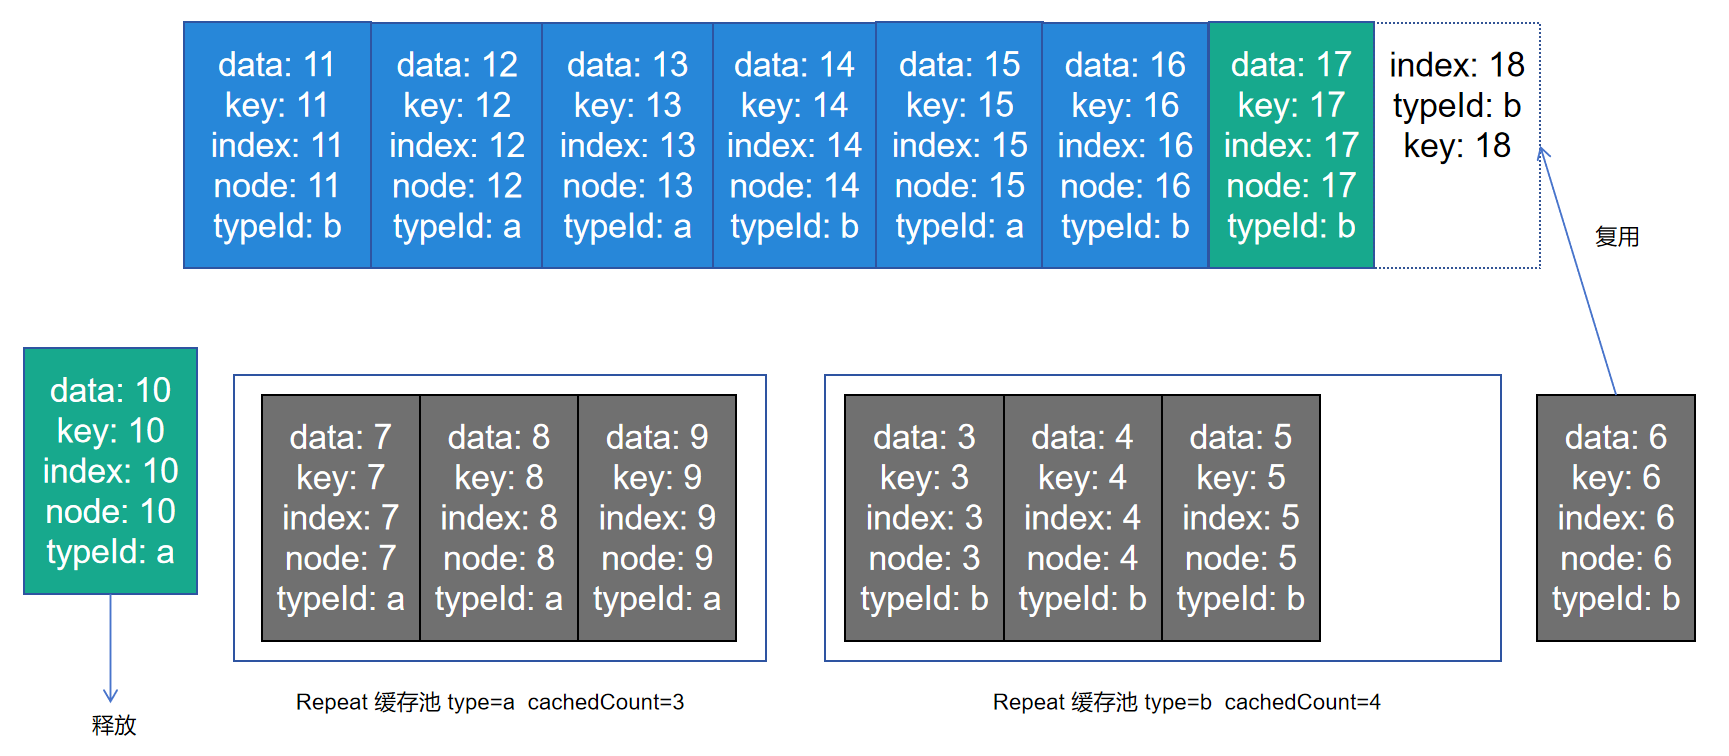
index=18的数据进入屏幕及父组件预加载的范围内,此时计算出其template type等于b,这时Repeat会从template type等于b的缓存池中取出一个节点进行复用,更新它的key&index&data,该子节点内部使用了该项数据及索引的其他孙子节点会根据V2状态管理的规则做同步更新。
index=10的节点划出了屏幕及父组件预加载的范围。当UI主线程空闲时,会去检测template type等于a的缓存池是否还有空间,此时缓存池中有四个节点,超过了额定的3个,Repeat会释放掉最后一个节点。

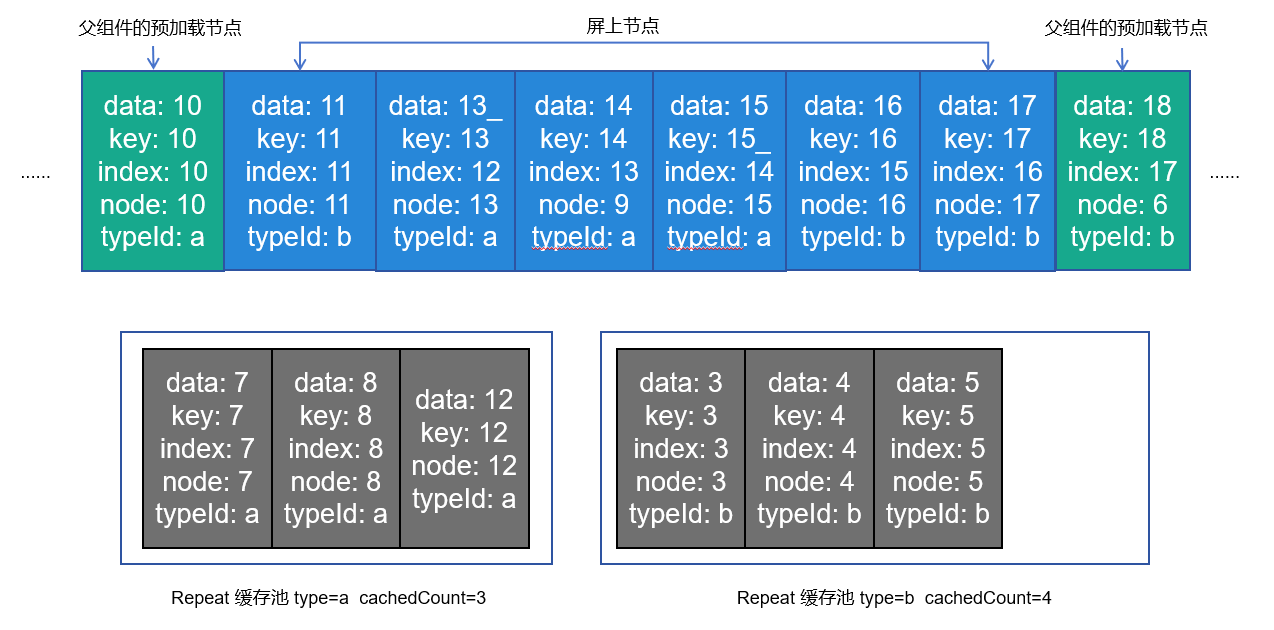
#### 数据更新场景

此时我们做如下更新操作,删除index=12节点,更新index=13节点的数据,更新index=14节点的template type为a,更新index=15节点的key。

此时Repeat会通知父组件重新布局,逐一对比template type值,若和原节点template type值相同,则复用该节点,更新key、index和data,若template type值发生变化,则复用相应template type的缓存池中的节点,并更新key、index和data。
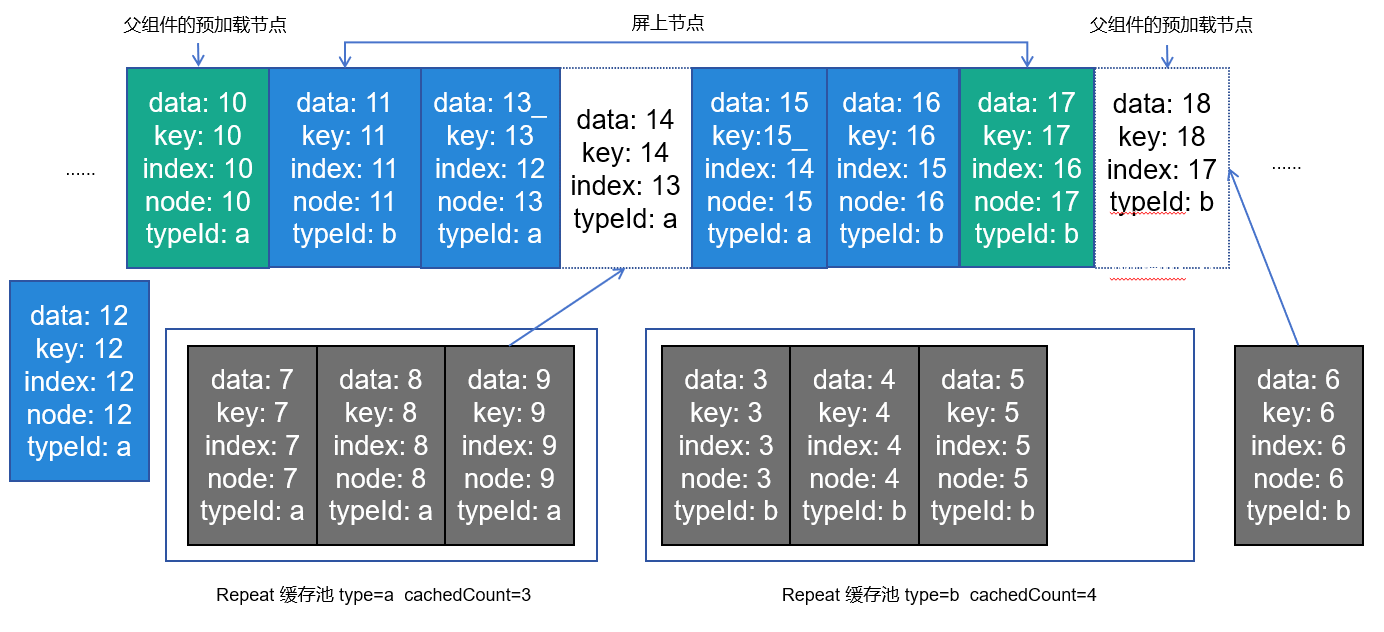
上图显示node13节点更新了数据data和index;node14更新了template type和index,于是从缓存池中取走一个复用;node15由于key值发生变化并且template type不变,复用自身节点并同步更新key、index、data;node16和node17均只更新index。index=17的节点是新的,从缓存池中复用。
### template:子组件渲染模板
template模板目前只支持在virtualScroll模式下使用。
- 每个节点会根据`.templateId()`得到template type,从而渲染对应的`.template()`中的子组件。
- 当多个template type相同时,Repeat会覆盖先定义的`.template()`函数,仅生效最后定义的`.template()`。
- 如果找不到对应的template type,Repeat会优先渲染type为空的`.template()`中的子组件,如果没有,则渲染`.each()`中的子组件。
### totalCount:期望加载的数据长度
totalCount表示期望加载的数据长度,默认为原数组长度,可以大于已加载数据项的数量。令arr.length表示数据源长度,以下为totalCount的处理规则:
- totalCount缺省/非自然数时,totalCount默认为arr.length,列表正常滚动。
- 0 <= totalCount < arr.length时,界面中只渲染“totalCount”个数据。
- totalCount > arr.length时,代表Repeat将渲染totalCount个数据,滚动条样式根据totalCount值变化。
> **注意:**
>
> 当totalCount > arr.length时,在父组件容器滚动过程中,应用需要保证列表即将滑动到数据源末尾时请求后续数据,开发者需要对数据请求的错误场景(如网络延迟)进行保护操作,直到数据源全部加载完成,否则列表滑动的过程中会出现滚动效果异常。
### cachedCount:空闲节点缓存列表大小
cachedCount是相应的template type的缓存池中可缓存子组件节点的最大数量,仅在virtualScroll模式下生效。
> **说明:**
>
> 滚动容器组件属性`.cachedCount()`和`.template()`的参数`cachedCount`都是为了平衡性能和内存,但是含义是不同的。
> - 滚动类容器组件`.cachedCount()`:是指在可见范围外预加载的节点,这些节点会位于组件树上,但不是可见范围内,List/Grid等容器组件会额外渲染这些可见范围外的节点,从而达到其性能收益。Repeat会将这些节点视为“可见”的。
> - `.template()`中的`cachedCount`: 是指Repeat视为“不可见”的节点,这些节点是空闲的,框架会暂时保存,在需要使用的时候更新这些节点,从而实现复用。
将cachedCount设置为当前模板的节点在屏上可能出现的最大数量时,Repeat可以做到尽可能多的复用。但后果是当屏上没有当前模板的节点时,缓存池也不会释放,应用内存会增大。需要开发者根据具体情况自行把控。
- cachedCount缺省时,框架会分别对不同template,根据屏上节点+预加载的节点个数来计算cachedCount。当屏上节点+预加载的节点个数变多时,cachedCount也会对应增长。需要注意cachedCount数量不会减少。
- 显式指定cachedCount,推荐设置成和屏幕上节点个数一致。需要注意,不推荐设置cachedCount小于2,因为这会导致在快速滑动场景下创建新的节点,从而导致性能劣化。
## 使用场景
### non-virtualScroll数据展示&操作
#### 数据源变化
```ts
@Entry
@ComponentV2
struct Parent {
@Local simpleList: Array = ['one', 'two', 'three'];
build() {
Row() {
Column() {
Text('点击修改第3个数组项的值')
.fontSize(24)
.fontColor(Color.Red)
.onClick(() => {
this.simpleList[2] = 'new three';
})
Repeat(this.simpleList)
.each((obj: RepeatItem)=>{
ChildItem({ item: obj.item })
.margin({top: 20})
})
.key((item: string) => item)
}
.justifyContent(FlexAlign.Center)
.width('100%')
.height('100%')
}
.height('100%')
.backgroundColor(0xF1F3F5)
}
}
@ComponentV2
struct ChildItem {
@Param @Require item: string;
build() {
Text(this.item)
.fontSize(30)
}
}
```
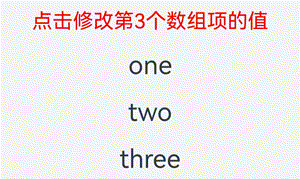
第三个数组项重新渲染时会复用之前的第三项的组件,仅对数据做了刷新。
#### 索引值变化
下方例子当交换数组项1和2时,若键值和上次保持一致,Repeat会复用之前的组件,仅对使用了index索引值的组件做数据刷新。
```ts
@Entry
@ComponentV2
struct Parent {
@Local simpleList: Array = ['one', 'two', 'three'];
build() {
Row() {
Column() {
Text('交换数组项1,2')
.fontSize(24)
.fontColor(Color.Red)
.onClick(() => {
let temp: string = this.simpleList[2]
this.simpleList[2] = this.simpleList[1]
this.simpleList[1] = temp
})
.margin({bottom: 20})
Repeat(this.simpleList)
.each((obj: RepeatItem)=>{
Text("index: " + obj.index)
.fontSize(30)
ChildItem({ item: obj.item })
.margin({bottom: 20})
})
.key((item: string) => item)
}
.justifyContent(FlexAlign.Center)
.width('100%')
.height('100%')
}
.height('100%')
.backgroundColor(0xF1F3F5)
}
}
@ComponentV2
struct ChildItem {
@Param @Require item: string;
build() {
Text(this.item)
.fontSize(30)
}
}
```

### virtualScroll数据展示&操作
本小节将展示virtualScroll模式下,Repeat的实际使用场景和组件节点的复用情况。根据复用规则可以衍生出大量的测试场景,篇幅原因,只对典型的数据变化进行解释。
#### 一个template
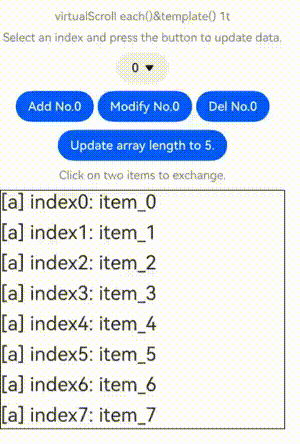
下面的代码示例展示了Repeat virtualScroll模式下修改数组的常见操作,包括**插入数据、修改数据、删除数据、交换数据**。点击下拉框选择索引index值,点击相应的按钮即可进行数据修改操作。依次点击数据项可以交换被点击的两个数据项。
```ts
@ObservedV2
class Repeat005Clazz {
@Trace message: string = '';
constructor(message: string) {
this.message = message;
}
}
@Entry
@ComponentV2
struct RepeatVirtualScroll {
@Local simpleList: Array = [];
private exchange: number[] = [];
private counter: number = 0;
@Local selectOptions: SelectOption[] = [];
@Local selectIdx: number = 0;
@Monitor("simpleList")
reloadSelectOptions(): void {
this.selectOptions = [];
for (let i = 0; i < this.simpleList.length; ++i) {
this.selectOptions.push({ value: i.toString() });
}
if (this.selectIdx >= this.simpleList.length) {
this.selectIdx = this.simpleList.length - 1;
}
}
aboutToAppear(): void {
for (let i = 0; i < 100; i++) {
this.simpleList.push(new Repeat005Clazz(`item_${i}`));
}
this.reloadSelectOptions();
}
handleExchange(idx: number): void { // 点击交换子组件
this.exchange.push(idx);
if (this.exchange.length === 2) {
let _a = this.exchange[0];
let _b = this.exchange[1];
let temp: Repeat005Clazz = this.simpleList[_a];
this.simpleList[_a] = this.simpleList[_b];
this.simpleList[_b] = temp;
this.exchange = [];
}
}
build() {
Column({ space: 10 }) {
Text('virtualScroll each()&template() 1t')
.fontSize(15)
.fontColor(Color.Gray)
Text('Select an index and press the button to update data.')
.fontSize(15)
.fontColor(Color.Gray)
Select(this.selectOptions)
.selected(this.selectIdx)
.value(this.selectIdx.toString())
.key('selectIdx')
.onSelect((index: number) => {
this.selectIdx = index;
})
Row({ space: 5 }) {
Button('Add No.' + this.selectIdx)
.onClick(() => {
this.simpleList.splice(this.selectIdx, 0, new Repeat005Clazz(`${this.counter++}_add_item`));
this.reloadSelectOptions();
})
Button('Modify No.' + this.selectIdx)
.onClick(() => {
this.simpleList.splice(this.selectIdx, 1, new Repeat005Clazz(`${this.counter++}_modify_item`));
})
Button('Del No.' + this.selectIdx)
.onClick(() => {
this.simpleList.splice(this.selectIdx, 1);
this.reloadSelectOptions();
})
}
Button('Update array length to 5.')
.onClick(() => {
this.simpleList = this.simpleList.slice(0, 5);
this.reloadSelectOptions();
})
Text('Click on two items to exchange.')
.fontSize(15)
.fontColor(Color.Gray)
List({ space: 10 }) {
Repeat(this.simpleList)
.each((obj: RepeatItem) => {
ListItem() {
Text(`[each] index${obj.index}: ${obj.item.message}`)
.fontSize(25)
.onClick(() => {
this.handleExchange(obj.index);
})
}
})
.key((item: Repeat005Clazz, index: number) => {
return item.message;
})
.virtualScroll({ totalCount: this.simpleList.length })
.templateId(() => "a")
.template('a', (ri) => {
Text(`[a] index${ri.index}: ${ri.item.message}`)
.fontSize(25)
.onClick(() => {
this.handleExchange(ri.index);
})
}, { cachedCount: 3 })
}
.cachedCount(2)
.border({ width: 1 })
.width('95%')
.height('40%')
}
.justifyContent(FlexAlign.Center)
.width('100%')
.height('100%')
}
}
```
该应用列表内容为100项自定义类`RepeatClazz`的`message`字符串属性,List组件的cachedCount设为2,模板'a'的缓存池大小设为3。应用界面如下图所示:
#### 多个template
```ts
@ObservedV2
class Repeat006Clazz {
@Trace message: string = '';
constructor(message: string) {
this.message = message;
}
}
@Entry
@ComponentV2
struct RepeatVirtualScroll2T {
@Local simpleList: Array = [];
private exchange: number[] = [];
private counter: number = 0;
@Local selectOptions: SelectOption[] = [];
@Local selectIdx: number = 0;
@Monitor("simpleList")
reloadSelectOptions(): void {
this.selectOptions = [];
for (let i = 0; i < this.simpleList.length; ++i) {
this.selectOptions.push({ value: i.toString() });
}
if (this.selectIdx >= this.simpleList.length) {
this.selectIdx = this.simpleList.length - 1;
}
}
aboutToAppear(): void {
for (let i = 0; i < 100; i++) {
this.simpleList.push(new Repeat006Clazz(`item_${i}`));
}
this.reloadSelectOptions();
}
handleExchange(idx: number): void { // 点击交换子组件
this.exchange.push(idx);
if (this.exchange.length === 2) {
let _a = this.exchange[0];
let _b = this.exchange[1];
let temp: Repeat006Clazz = this.simpleList[_a];
this.simpleList[_a] = this.simpleList[_b];
this.simpleList[_b] = temp;
this.exchange = [];
}
}
build() {
Column({ space: 10 }) {
Text('virtualScroll each()&template() 2t')
.fontSize(15)
.fontColor(Color.Gray)
Text('Select an index and press the button to update data.')
.fontSize(15)
.fontColor(Color.Gray)
Select(this.selectOptions)
.selected(this.selectIdx)
.value(this.selectIdx.toString())
.key('selectIdx')
.onSelect((index: number) => {
this.selectIdx = index;
})
Row({ space: 5 }) {
Button('Add No.' + this.selectIdx)
.onClick(() => {
this.simpleList.splice(this.selectIdx, 0, new Repeat006Clazz(`${this.counter++}_add_item`));
this.reloadSelectOptions();
})
Button('Modify No.' + this.selectIdx)
.onClick(() => {
this.simpleList.splice(this.selectIdx, 1, new Repeat006Clazz(`${this.counter++}_modify_item`));
})
Button('Del No.' + this.selectIdx)
.onClick(() => {
this.simpleList.splice(this.selectIdx, 1);
this.reloadSelectOptions();
})
}
Button('Update array length to 5.')
.onClick(() => {
this.simpleList = this.simpleList.slice(0, 5);
this.reloadSelectOptions();
})
Text('Click on two items to exchange.')
.fontSize(15)
.fontColor(Color.Gray)
List({ space: 10 }) {
Repeat(this.simpleList)
.each((obj: RepeatItem) => {
ListItem() {
Text(`[each] index${obj.index}: ${obj.item.message}`)
.fontSize(25)
.onClick(() => {
this.handleExchange(obj.index);
})
}
})
.key((item: Repeat006Clazz, index: number) => {
return item.message;
})
.virtualScroll({ totalCount: this.simpleList.length })
.templateId((item: Repeat006Clazz, index: number) => {
return (index % 2 === 0) ? 'odd' : 'even';
})
.template('odd', (ri) => {
Text(`[odd] index${ri.index}: ${ri.item.message}`)
.fontSize(25)
.fontColor(Color.Blue)
.onClick(() => {
this.handleExchange(ri.index);
})
}, { cachedCount: 3 })
.template('even', (ri) => {
Text(`[even] index${ri.index}: ${ri.item.message}`)
.fontSize(25)
.fontColor(Color.Green)
.onClick(() => {
this.handleExchange(ri.index);
})
}, { cachedCount: 1 })
}
.cachedCount(2)
.border({ width: 1 })
.width('95%')
.height('40%')
}
.justifyContent(FlexAlign.Center)
.width('100%')
.height('100%')
}
}
```

### Repeat嵌套
Repeat支持嵌套使用。下面是使用virtualScroll模式进行嵌套的示例代码:
```ts
// Repeat嵌套
@Entry
@ComponentV2
struct RepeatNest {
@Local outerList: string[] = [];
@Local innerList: number[] = [];
aboutToAppear(): void {
for (let i = 0; i < 20; i++) {
this.outerList.push(i.toString());
this.innerList.push(i);
}
}
build() {
Column({ space: 20 }) {
Text('Repeat virtualScroll嵌套')
.fontSize(15)
.fontColor(Color.Gray)
List() {
Repeat(this.outerList)
.each((obj) => {
ListItem() {
Column() {
Text('outerList item: ' + obj.item)
.fontSize(30)
List() {
Repeat(this.innerList)
.each((subObj) => {
ListItem() {
Text('innerList item: ' + subObj.item)
.fontSize(20)
}
})
.key((item) => "innerList_" + item)
.virtualScroll()
}
.width('80%')
.border({ width: 1 })
.backgroundColor(Color.Orange)
}
.height('30%')
.backgroundColor(Color.Pink)
}
.border({ width: 1 })
})
.key((item) => "outerList_" + item)
.virtualScroll()
}
.width('80%')
.border({ width: 1 })
}
.justifyContent(FlexAlign.Center)
.width('90%')
.height('80%')
}
}
```
运行效果:

### 父容器组件应用场景
本节展示Repeat virtualScroll模式与容器组件的常见应用场景。
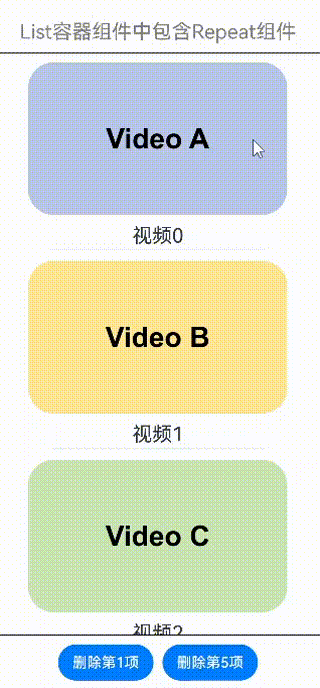
#### 与List组合使用
在List容器组件中使用Repeat的virtualScroll模式,示例如下:
```ts
class DemoListItemInfo {
name: string;
icon: Resource;
constructor(name: string, icon: Resource) {
this.name = name;
this.icon = icon;
}
}
@Entry
@ComponentV2
struct DemoList {
@Local videoList: Array = [];
aboutToAppear(): void {
for (let i = 0; i < 10; i++) {
// 此处app.media.listItem0、app.media.listItem1、app.media.listItem2仅作示例,请开发者自行替换
this.videoList.push(new DemoListItemInfo('视频' + i,
i % 3 == 0 ? $r("app.media.listItem0") :
i % 3 == 1 ? $r("app.media.listItem1") : $r("app.media.listItem2")));
}
}
@Builder
itemEnd(index: number) {
Button('删除')
.backgroundColor(Color.Red)
.onClick(() => {
this.videoList.splice(index, 1);
})
}
build() {
Column({ space: 10 }) {
Text('List容器组件中包含Repeat组件')
.fontSize(15)
.fontColor(Color.Gray)
List({ space: 5 }) {
Repeat(this.videoList)
.each((obj: RepeatItem) => {
ListItem() {
Column() {
Image(obj.item.icon)
.width('80%')
.margin(10)
Text(obj.item.name)
.fontSize(20)
}
}
.swipeAction({
end: {
builder: () => {
this.itemEnd(obj.index);
}
}
})
.onAppear(() => {
console.info('AceTag', obj.item.name);
})
})
.key((item: DemoListItemInfo) => item.name)
.virtualScroll()
}
.cachedCount(2)
.height('90%')
.border({ width: 1 })
.listDirection(Axis.Vertical)
.alignListItem(ListItemAlign.Center)
.divider({
strokeWidth: 1,
startMargin: 60,
endMargin: 60,
color: '#ffe9f0f0'
})
Row({ space: 10 }) {
Button('删除第1项')
.onClick(() => {
this.videoList.splice(0, 1);
})
Button('删除第5项')
.onClick(() => {
this.videoList.splice(4, 1);
})
}
}
.width('100%')
.height('100%')
.justifyContent(FlexAlign.Center)
}
}
```
右滑并点击按钮,或点击底部按钮,可删除视频卡片:
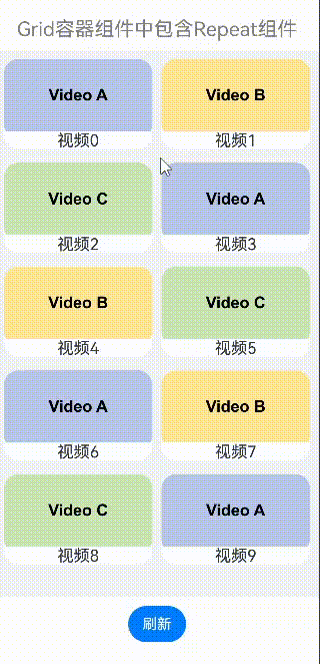
#### 与Grid组合使用
在Grid容器组件中使用Repeat的virtualScroll模式,示例如下:
```ts
class DemoGridItemInfo {
name: string;
icon: Resource;
constructor(name: string, icon: Resource) {
this.name = name;
this.icon = icon;
}
}
@Entry
@ComponentV2
struct DemoGrid {
@Local itemList: Array = [];
@Local isRefreshing: boolean = false;
private layoutOptions: GridLayoutOptions = {
regularSize: [1, 1],
irregularIndexes: [10]
}
private GridScroller: Scroller = new Scroller();
private num: number = 0;
aboutToAppear(): void {
for (let i = 0; i < 10; i++) {
// 此处app.media.gridItem0、app.media.gridItem1、app.media.gridItem2仅作示例,请开发者自行替换
this.itemList.push(new DemoGridItemInfo('视频' + i,
i % 3 == 0 ? $r("app.media.gridItem0") :
i % 3 == 1 ? $r("app.media.gridItem1") : $r("app.media.gridItem2")));
}
}
build() {
Column({ space: 10 }) {
Text('Grid容器组件中包含Repeat组件')
.fontSize(15)
.fontColor(Color.Gray)
Refresh({ refreshing: $$this.isRefreshing }) {
Grid(this.GridScroller, this.layoutOptions) {
Repeat(this.itemList)
.each((obj: RepeatItem) => {
if (obj.index === 10 ) {
GridItem() {
Text('先前浏览至此,点击刷新')
.fontSize(20)
}
.height(30)
.border({ width: 1 })
.onClick(() => {
this.GridScroller.scrollToIndex(0);
this.isRefreshing = true;
})
.onAppear(() => {
console.info('AceTag', obj.item.name);
})
} else {
GridItem() {
Column() {
Image(obj.item.icon)
.width('100%')
.height(80)
.objectFit(ImageFit.Cover)
.borderRadius({ topLeft: 16, topRight: 16 })
Text(obj.item.name)
.fontSize(15)
.height(20)
}
}
.height(100)
.borderRadius(16)
.backgroundColor(Color.White)
.onAppear(() => {
console.info('AceTag', obj.item.name);
})
}
})
.key((item: DemoGridItemInfo) => item.name)
.virtualScroll()
}
.columnsTemplate('repeat(auto-fit, 150)')
.cachedCount(4)
.rowsGap(15)
.columnsGap(10)
.height('100%')
.padding(10)
.backgroundColor('#F1F3F5')
}
.onRefreshing(() => {
setTimeout(() => {
this.itemList.splice(10, 1);
this.itemList.unshift(new DemoGridItemInfo('refresh', $r('app.media.gridItem0'))); // 此处app.media.gridItem0仅作示例,请开发者自行替换
for (let i = 0; i < 10; i++) {
// 此处aapp.media.gridItem0、app.media.gridItem1、app.media.gridItem2仅作示例,请开发者自行替换
this.itemList.unshift(new DemoGridItemInfo('新视频' + this.num,
i % 3 == 0 ? $r("app.media.gridItem0") :
i % 3 == 1 ? $r("app.media.gridItem1") : $r("app.media.gridItem2")));
this.num++;
}
this.isRefreshing = false;
}, 1000);
console.info('AceTag', 'onRefreshing');
})
.refreshOffset(64)
.pullToRefresh(true)
.width('100%')
.height('85%')
Button('刷新')
.onClick(() => {
this.GridScroller.scrollToIndex(0);
this.isRefreshing = true;
})
}
.width('100%')
.height('100%')
.justifyContent(FlexAlign.Center)
}
}
```
下拉屏幕,或点击刷新按钮,或点击“先前浏览至此,点击刷新”,可加载新的视频内容:
#### 与Swiper组合使用
在Swiper容器组件中使用Repeat的virtualScroll模式,示例如下:
```ts
const remotePictures: Array = [
'https://www.example.com/xxx/0001.jpg', // 请填写具体的网络图片地址
'https://www.example.com/xxx/0002.jpg',
'https://www.example.com/xxx/0003.jpg',
'https://www.example.com/xxx/0004.jpg',
'https://www.example.com/xxx/0005.jpg',
'https://www.example.com/xxx/0006.jpg',
'https://www.example.com/xxx/0007.jpg',
'https://www.example.com/xxx/0008.jpg',
'https://www.example.com/xxx/0009.jpg'
];
@ObservedV2
class DemoSwiperItemInfo {
id: string;
@Trace url: string = 'default';
constructor(id: string) {
this.id = id;
}
}
@Entry
@ComponentV2
struct DemoSwiper {
@Local pics: Array = [];
aboutToAppear(): void {
for (let i = 0; i < 9; i++) {
this.pics.push(new DemoSwiperItemInfo('pic' + i));
}
setTimeout(() => {
this.pics[0].url = remotePictures[0];
}, 1000);
}
build() {
Column() {
Text('Swiper容器组件中包含Repeat组件')
.fontSize(15)
.fontColor(Color.Gray)
Stack() {
Text('图片加载中')
.fontSize(15)
.fontColor(Color.Gray)
Swiper() {
Repeat(this.pics)
.each((obj: RepeatItem) => {
Image(obj.item.url)
.onAppear(() => {
console.info('AceTag', obj.item.id);
})
})
.key((item: DemoSwiperItemInfo) => item.id)
.virtualScroll()
}
.cachedCount(9)
.height('50%')
.loop(false)
.indicator(true)
.onChange((index) => {
setTimeout(() => {
this.pics[index].url = remotePictures[index];
}, 1000);
})
}
.width('100%')
.height('100%')
.backgroundColor(Color.Black)
}
}
}
```
定时1秒后加载图片,模拟网络延迟:

## 常见问题
### 屏幕外的列表数据发生变化时,保证滚动条位置不变
在List组件中声明Repeat组件,实现key值生成逻辑和each逻辑(如下示例代码),点击按钮“insert”,在屏幕显示的第一个元素前面插入一个元素,屏幕出现向下滚动。
```ts
// 定义一个类,标记为可观察的
// 类中自定义一个数组,标记为可追踪的
@ObservedV2
class ArrayHolder {
@Trace arr: Array = [];
// constructor,用于初始化数组个数
constructor(count: number) {
for (let i = 0; i < count; i++) {
this.arr.push(i);
}
}
}
@Entry
@ComponentV2
struct RepeatTemplateSingle {
@Local arrayHolder: ArrayHolder = new ArrayHolder(100);
@Local totalCount: number = this.arrayHolder.arr.length;
scroller: Scroller = new Scroller();
build() {
Column({ space: 5 }) {
List({ space: 20, initialIndex: 19, scroller: this.scroller }) {
Repeat(this.arrayHolder.arr)
.virtualScroll({ totalCount: this.totalCount })
.templateId((item, index) => {
return 'number';
})
.template('number', (r) => {
ListItem() {
Text(r.index! + ":" + r.item + "Reuse");
}
})
.each((r) => {
ListItem() {
Text(r.index! + ":" + r.item + "eachMessage");
}
})
}
.height('30%')
Button(`insert totalCount ${this.totalCount}`)
.height(60)
.onClick(() => {
// 插入元素,元素位置为屏幕显示的前一个元素
this.arrayHolder.arr.splice(18, 0, this.totalCount);
this.totalCount = this.arrayHolder.arr.length;
})
}
.width('100%')
.margin({ top: 5 })
}
}
```
运行效果:

在一些场景中,我们不希望屏幕外的数据源变化影响屏幕中List列表Scroller停留的位置,可以通过List组件的[onScrollIndex](../ui/arkts-layout-development-create-list.md#响应滚动位置)事件对列表滚动动作进行监听,当列表发生滚动时,获取列表滚动位置。使用Scroller组件的[scrollToIndex](../reference/apis-arkui/arkui-ts/ts-container-scroll.md#scrolltoindex)特性,滑动到指定index位置,实现屏幕外的数据源增加/删除数据时,Scroller停留的位置不变的效果。
示例代码仅对增加数据的情况进行展示。
```ts
// ...ArrayHolder的定义和上述demo代码一致
@Entry
@ComponentV2
struct RepeatTemplateSingle {
@Local arrayHolder: ArrayHolder = new ArrayHolder(100);
@Local totalCount: number = this.arrayHolder.arr.length;
scroller: Scroller = new Scroller();
private start: number = 1;
private end: number = 1;
build() {
Column({ space: 5 }) {
List({ space: 20, initialIndex: 19, scroller: this.scroller }) {
Repeat(this.arrayHolder.arr)
.virtualScroll({ totalCount: this.totalCount })
.templateId((item, index) => {
return 'number';
})
.template('number', (r) => {
ListItem() {
Text(r.index! + ":" + r.item + "Reuse");
}
})
.each((r) => {
ListItem() {
Text(r.index! + ":" + r.item + "eachMessage");
}
})
}
.onScrollIndex((start, end) => {
this.start = start;
this.end = end;
})
.height('30%')
Button(`insert totalCount ${this.totalCount}`)
.height(60)
.onClick(() => {
// 插入元素,元素位置为屏幕显示的前一个元素
this.arrayHolder.arr.splice(18, 0, this.totalCount);
let rect = this.scroller.getItemRect(this.start); // 获取子组件的大小位置
this.scroller.scrollToIndex(this.start + 1); // 滑动到指定index
this.scroller.scrollBy(0, -rect.y); // 滑动指定距离
this.totalCount = this.arrayHolder.arr.length;
})
}
.width('100%')
.margin({ top: 5 })
}
}
```
运行效果:

### totalCount值大于数据源长度
当数据源总长度很大时,会使用懒加载的方式先加载一部分数据,为了使Repeat显示正确的滚动条样式,需要将数据总长度赋值给totalCount,即数据源全部加载完成前,totalCount大于array.length。
totalCount > array.length时,在父组件容器滚动过程中,应用需要保证列表即将滑动到数据源末尾时请求后续数据,开发者需要对数据请求的错误场景(如网络延迟)进行保护操作,直到数据源全部加载完成,否则列表滑动的过程中会出现滚动效果异常。
上述规范可以通过实现父组件List/Grid的[onScrollIndex](../ui/arkts-layout-development-create-list.md#响应滚动位置)属性的回调函数完成。示例代码如下:
```ts
@ObservedV2
class VehicleData {
@Trace name: string;
@Trace price: number;
constructor(name: string, price: number) {
this.name = name;
this.price = price;
}
}
@ObservedV2
class VehicleDB {
public vehicleItems: VehicleData[] = [];
constructor() {
// 数组初始化大小 20
for (let i = 1; i <= 20; i++) {
this.vehicleItems.push(new VehicleData(`Vehicle${i}`, i));
}
}
}
@Entry
@ComponentV2
struct entryCompSucc {
@Local vehicleItems: VehicleData[] = new VehicleDB().vehicleItems;
@Local listChildrenSize: ChildrenMainSize = new ChildrenMainSize(60);
@Local totalCount: number = this.vehicleItems.length;
scroller: Scroller = new Scroller();
build() {
Column({ space: 3 }) {
List({ scroller: this.scroller }) {
Repeat(this.vehicleItems)
.virtualScroll({ totalCount: 50 }) // 数组预期长度 50
.templateId(() => 'default')
.template('default', (ri) => {
ListItem() {
Column() {
Text(`${ri.item.name} + ${ri.index}`)
.width('90%')
.height(this.listChildrenSize.childDefaultSize)
.backgroundColor(0xFFA07A)
.textAlign(TextAlign.Center)
.fontSize(20)
.fontWeight(FontWeight.Bold)
}
}.border({ width: 1 })
}, { cachedCount: 5 })
.each((ri) => {
ListItem() {
Text("Wrong: " + `${ri.item.name} + ${ri.index}`)
.width('90%')
.height(this.listChildrenSize.childDefaultSize)
.backgroundColor(0xFFA07A)
.textAlign(TextAlign.Center)
.fontSize(20)
.fontWeight(FontWeight.Bold)
}.border({ width: 1 })
})
.key((item, index) => `${index}:${item}`)
}
.height('50%')
.margin({ top: 20 })
.childrenMainSize(this.listChildrenSize)
.alignListItem(ListItemAlign.Center)
.onScrollIndex((start, end) => {
console.log('onScrollIndex', start, end);
// 数据懒加载
if (this.vehicleItems.length < 50) {
for (let i = 0; i < 10; i++) {
if (this.vehicleItems.length < 50) {
this.vehicleItems.push(new VehicleData("Vehicle_loaded", i));
}
}
}
})
}
}
}
```
示例代码运行效果:

### Repeat与@Builder混用的限制
当Repeat与@Builder混用时,必须将RepeatItem类型整体进行传参,组件才能监听到数据变化,如果只传递`RepeatItem.item`或`RepeatItem.index`,将会出现UI渲染异常。
示例代码如下:
```ts
@Entry
@ComponentV2
struct RepeatBuilderPage {
@Local simpleList1: Array = [];
@Local simpleList2: Array = [];
aboutToAppear(): void {
for (let i = 0; i < 100; i++) {
this.simpleList1.push(i)
this.simpleList2.push(i)
}
}
build() {
Column({ space: 20 }) {
Text('Repeat与@Builder混用,左边是异常场景,右边是正常场景,向下滑动一段距离可以看出差别')
.fontSize(15)
.fontColor(Color.Gray)
Row({ space: 20 }) {
List({ initialIndex: 5, space: 20 }) {
Repeat(this.simpleList1)
.each((ri) => {})
.virtualScroll({ totalCount: this.simpleList1.length })
.templateId((item: number, index: number) => "default")
.template('default', (ri) => {
ListItem() {
Column() {
Text('Text id = ' + ri.item)
.fontSize(20)
this.buildItem1(ri.item) // 修改为:this.buildItem1(ri)
}
}
.border({ width: 1 })
}, { cachedCount: 3 })
}
.cachedCount(1)
.border({ width: 1 })
.width('45%')
.height('60%')
List({ initialIndex: 5, space: 20 }) {
Repeat(this.simpleList2)
.each((ri) => {})
.virtualScroll({ totalCount: this.simpleList2.length })
.templateId((item: number, index: number) => "default")
.template('default', (ri) => {
ListItem() {
Column() {
Text('Text id = ' + ri.item)
.fontSize(20)
this.buildItem2(ri)
}
}
.border({ width: 1 })
}, { cachedCount: 3 })
}
.cachedCount(1)
.border({ width: 1 })
.width('45%')
.height('60%')
}
}
.height('100%')
.justifyContent(FlexAlign.Center)
}
@Builder
// @Builder参数必须传RepeatItem类型才能正常渲染
buildItem1(item: number) {
Text('Builder1 id = ' + item)
.fontSize(20)
.fontColor(Color.Red)
.margin({ top: 2 })
}
@Builder
buildItem2(ri: RepeatItem) {
Text('Builder2 id = ' + ri.item)
.fontSize(20)
.fontColor(Color.Red)
.margin({ top: 2 })
}
}
```
界面展示如下图,进入页面后向下滑动一段距离可以看出差别,左边是错误用法,右边是正确用法(Text组件为黑色,Builder组件为红色)。上述代码展示了开发过程中易出错的场景,即在@Builder构造函数中传参方式为值传递。
