Table of Contents
To use the SDK in a project, the code from the SDK must be included in that project. The easiest way to do this is to link to static libraries. The SDK comes with build scripts to build static libraries for common environments.
Prerequisites
Building SDK code out of the box requires a number of tools. This section lists the tools used to build the SDK.
For more information on how to install these tools, refer to Guide to Installing Build Tools.
For a list of compilers and libraries that the SDK was validated on, refer to Tested Libraries and Compilers.
| Prerequisite | Notes -----------------------------— |
|---|---|
| A C/C++ compiler | Core code in C. Unit tests need C++11 support. |
| Python | Validated with v2.7.12 |
| SCons | Validated with v2.4.1 |
| Parts | 0.11.0 or later |
Building SDK with SCons
To use the SDK, you need to build it to generate libraries compatible with your build environment.
To build based on the default SConstruct file in the root directory of the SDK, invoke scons with no arguments.
cd <path/to/sdk-root>
scons
By default, this performs a release build of the SDK with unit tests for the current platform and runs unit tests.
To skip unit test execution when doing cross platform build use:
scons build:: utest::
Built components appear in the _install directory of the SDK root.
Potentially useful command line options:
| Option | Action -----------------------— |
|---|---|
--cfg=debug | Build in debug mode |
--cfg=release | Build in release mode |
--target=x86 | Target x86 (i386) architecture |
--target=x86_64 | Target x86-64 architecture |
--target=arm | Target 32-bit ARM architecture |
--target=arm_hf | Target 32-bit ARM architecture with hard float ABI |
--target=aarch64 | Target AArch64 (64-bit ARM) architecture |
--tc=cl | Use MSVC to compile (Microsoft®* C/C++ Compiler) |
--tc=gcc | Use GCC to compile (GNU* Compiler Collection) |
--tc=icl,mstools | Use Intel® C++ compiler for Windows |
--tc=icc,gnutools | Use Intel® C++ compiler for Linux |
build:: | Build the SDK (does not build unit tests) |
utest:: | Build unit tests |
run_utest:: | Run unit tests (builds tests if needed) |
-c | Clean the build |
-j N or --jobs=N | Allow N jobs at once |
Alternate Makefile Based Build Approach
You can build with the make command on platforms that support Make/Autoconf.
In the root directory of the SDK, run:
./configure
make all
make check
make install
./configure sets up the default settings:
- The default compilers are GCC/G++. You can specify compilers via the CC and CXX variables. For example,
./configure CC=/opt/intel/bin/icc CXX=/opt/intel/bin/icpc - The default installation directory is
./_install. You can specify the installation directory by using./configure --prefix=/usr/local/epid_install - The default target matches the current environment. You may change it with the CFLAGS parameter. For example,
./configure CFLAGS=-m32when run on x86_64 environment configures compilation to target x86.
make check is optional. It builds and runs the unit tests.
Alternatively, you can use make build as a shortcut to replace make all, make check, and make install.
To run N jobs at once use the -j N or --jobs=N option with the make command, e.g. make all -j 4 will allow make to create 4 jobs at once.
To clean the build, run make clean.
To remove the install directory, run make uninstall.
To configure cross compilation use --host option. For example, ./configure --host=arm-linux-gnueabi configures cross compilation build targeting ARM architecture. Cross compiled tests will not run on the build machine so make check should be replaced to make utest. A typical build sequence for cross compilation is as follows:
./configure --host=<target system>
make all
make utest
make install
Improving Performance with Commercial IPP
For higher performance, you can use the commercial version of Cryptography for Intel® Integrated Performance Primitives, available at https://software.intel.com/get-ipp-cryptography-libraries.
- Note
- The SDK has been validated with version 2018 (Update 2.1) of the cryptography library.
To build the SDK using a commercial Intel® IPP installation, the IPPCRYPTOROOT environment variable must be properly configured to point to the IPP installation directory, as described in Setting Environment Variables in the Intel® IPP Crypto Developer Guide.
Once the environment is configured, you can build using commercial IPP by specifying --use-commercial-ipp as a command line option.
Optimizing for Code Size
To build the SDK with a member with substantially reduced code size, you can use tiny mode.
To build with SCons, go to the root directory of the SDK and run:
scons --prod-var=tiny
To build with Make, go to the root directory of the SDK and run:
./configure --enable-tiny
make all
make check
make install
Limitations
By design, a member built in tiny mode has the following limitations:
- TPM mode is not supported.
- Only SHA-256 and SHA-512 are supported.
- Signature pre-computation is not supported.
- Compressed keys are not supported.
- Commercial IPP cannot be used.
- The implementation prioritizes size over performance.
Example Programs
The SDK includes several examples that show you different aspects of how the Intel® EPID scheme works. In the SDK build, these examples are located in _install/epid-sdk/example.
| Name | Description ----------— |
|---|---|
signmsg | Create Intel® EPID signature of message |
verifysig | Verify signature is from a group member in good standing |
Building with Other Build Systems
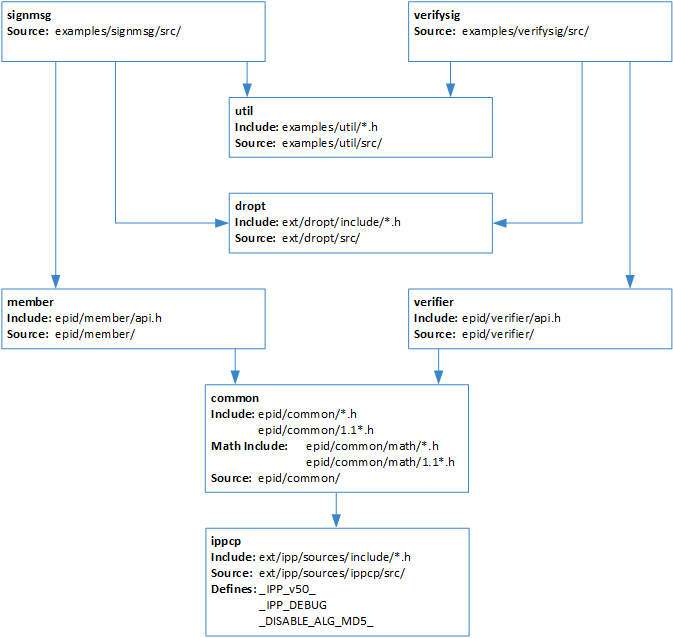
It is relatively straightforward to port the SDK to your build system of choice. The following dependency diagram shows the relationship between components and the sources used to build them.
*Other names and brands may be claimed as the property of others.